I’m building a floating deck in my back yard! Catch the whole thing, start to finish, right here.
Hey guys! It’s time for the next post in this long-awaited (at least, for me!) update. I’ve finally gotten enough coffee in my system and quieted the dogs long enough to finish this post and give you another written + video combo.
Brace yourselves, we’ve got a lot to cover!
If you recall from the first post where I talked about the deck plan, I shared the overall design, explained some of the decision making that went in, and where my challenges/research led.

Once I’d come up with my overall plan… it was time to get to work!
Recommended tools and materials
May contain affiliate links or links to related posts
- miter saw
- drill
- drill bits
- impact driver
- GRK 2 1/2-inch screws
- GRK 3 1/8-inch screws
- GRK 4-inch structural screws
- 4-ft level
- Ground Contact lumber – 2x6s, 2x4s, and 1x4s (more on why below)
- composite shims
- 3 3/4″ concrete screws
- hammer drill (if you don’t have one of these, you can get a kit like this that will adapt your impact driver)
- deck blocks
- landscape fabric
- gravel
- shovel or mattock
- stainless steel brackets/joist hangers
Ground Contact lumber
One of the biggest new pieces of info I picked up as I made my deck plan was discovering that I would likely need to use Ground Contact lumber for the entire project. I was excited to bring Wood Its Real onboard as a sponsor, and I’m so glad I did when I did, because it was through them that I learned about these new recommendations.
As common sense would tell you, outdoor wood projects need more protection than the stuff you’d use on the interior. And most of you probably also know about using “pressure treated” or PT wood for common outdoor projects to make them last longer. But as of 2016, there are new guidelines designating what kind of pressure-treated lumber should be used, and when. As you might guess, part of it is in the name. Since termites and fungi and all sorts of nasty critters live in the ground, that type of contact is especially important to protect against. There are a few other scenarios where Ground Contact is recommended:
- Wood will come in contact with soil, vegetation, leaf litter, and debris that can hold moisture for extended periods of time.
- You don’t expect good air circulation, especially on the underside and between decking boards.
- Wood components are installed less than six inches above the ground and are supported by treated wood or concrete without a moisture-transferring barrier/break.
- Wood is in direct contact with material that already shows signs of decay.
- Wood gets wet on a very frequent, recurring basis and doesn’t have time to dry adequately.
- You are building in a tropical climate.
Well, whaddya know… my new deck is going to meet a LOT of that criteria!
I noticed that my local Lowe’s was kind of half-and-half about having Above Ground and Ground Contact lumber, but the nearby Home Depot seems to have switched out almost all of theirs for Ground Contact. Honestly, it makes sense with a store’s limited shelf space.


Building a floating deck frame
Build outer frame
I began by cutting and building the outer frame. I could have started with the deck blocks and supports and laid it all out, but for whatever reason, this way just seemed to make more sense to me.

For the outer frame, I pre-drilled each hole and used exterior screws. Don’t waste your time like I did! Use exterior screws that don’t need pre-drilling. Like the Ground Contact lumber, you spend a little more for better quality materials. It’s worth it.

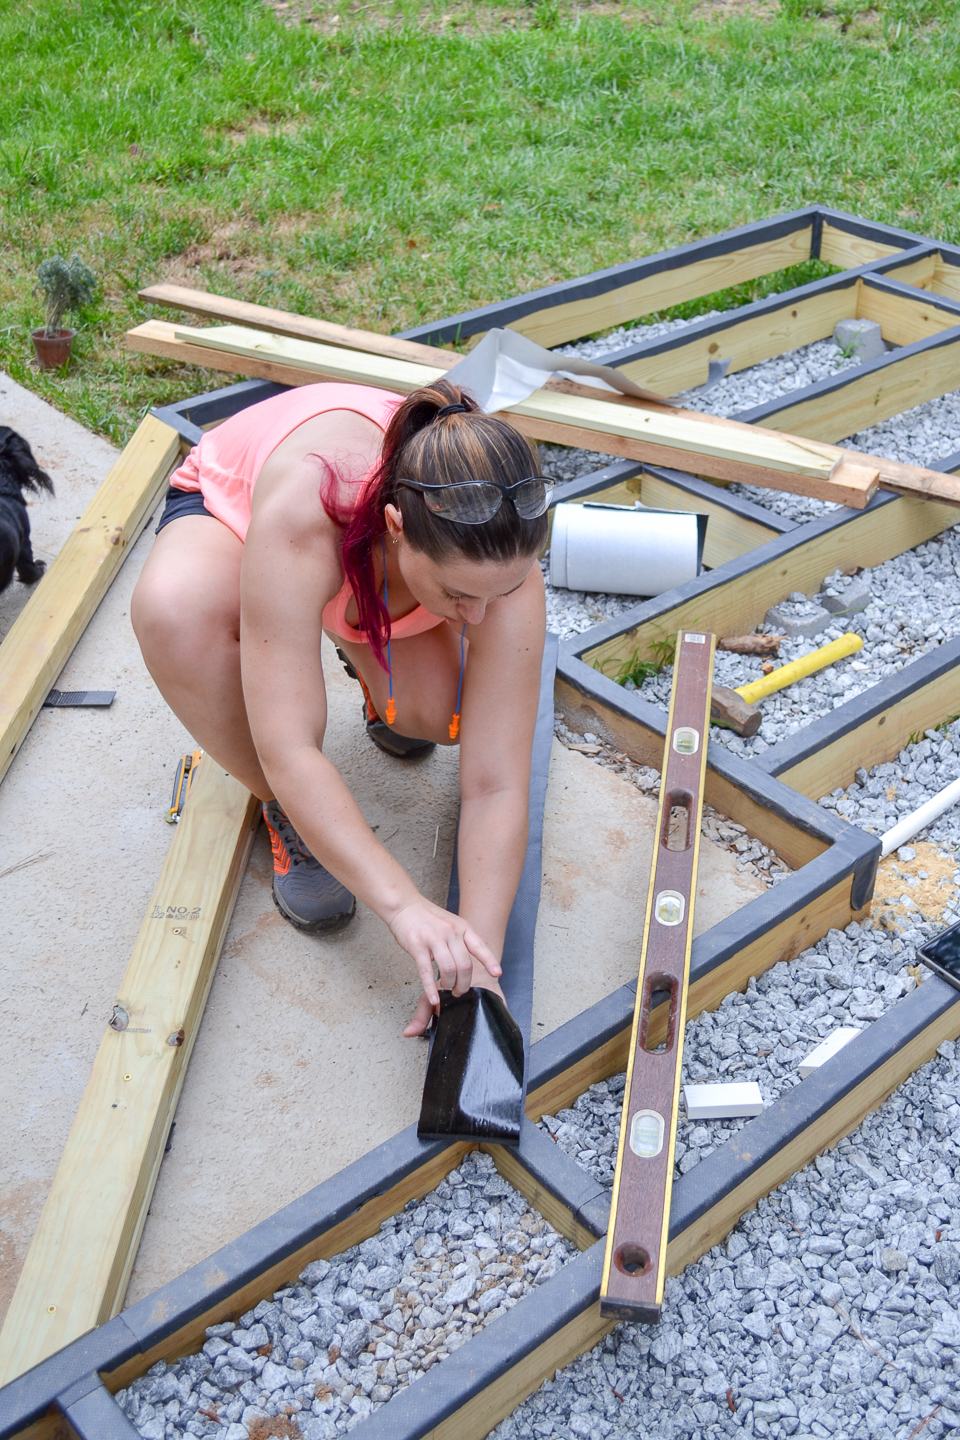
Elevate and level out
The frame, at this point, was screwed together, but it was still a rickety mess. To keep the corners square, I reinforced them with a piece of scrap lumber. I would later discard these once the rest of the frame and other supports went in.

I also lifted up the frame using some scrap lumber and my 4-foot level (one of my favorite hand-me-downs from my grandfather). It’s normal for things like this to still have a s l i g h t slope for water runoff (it only looks level, but isn’t), so I noted the way the level looked when laying it on the patio and tried to match the same slope with the deck frame.
Space out supports
I marked every 16 inches and placed another 2×6 in the frame. The longest boards I brought home were 12 feet, but the deck is longer at one end. So, I added another board a couple of feet from the end to give the 12-foot boards something to screw into. Kinda easy, but it helps to have someone assist by holding up all the other ends.

At all corners and in the one spot where I used a 4×4 to help elevate the deck, I added self-tapping structural screws (at this point, I finally bought better ones that didn’t require pre-drilling). For the rest of the structure, I went back through and secured with self-tapping 3 1/8″ fasteners (you can just do this the first time and avoid the double effort!). I also added some stainless steel brackets on some of those joists that I thought were high enough off the ground to add it.
Note: hardware not pictured — I did a lot of second-guessing myself at one point and chose to add more hardware/brackets on the joists of the highest side as the deck boards went on. But since some of my research argued against using it in areas with direct ground exposure, I used them only where I thought applicable. I can really only say “use your best judgment and consult a structural engineer” if you have questions, since this is still my first time building something like this — and, of course, I’m a homeowner messing with her own house, not a professional contractor. This thing mostly sits on the ground, so I’m not super worried about falling down and/or not lasting for as long as I want it. But as with any large build, one tutorial is never enough! It’s always best to read multiple tutorials and make the most informed decision possible. <3
Waterproofing a deck
Somehow, a deck, the Wicked Witch, and cotton candy have the same greatest foe: water.
To combat this (at least, in the deck’s case), there are a number of different options. While we may call this “waterproofing”, what we’re really talking about is adding moisture barriers to help the wood dry out as quickly as possible. Rot is still a natural inevitability with just about everything; we’re just trying to prevent that as best we can. They’re all good suggestions, but doing a combination of more than one seemed like the right option for me:
- Using ground contact lumber (6 inches or less above ground, in contact with concrete, etc.) –

- Laying down landscaping fabric and gravel under the deck –
- Brushing a sealant on cut joist ends
- Using flashing tape on the frame (prevents water from sitting in between the deck boards and the joists) –
After spacing out the deck blocks and digging them down, I surrounded everything with landscaping fabric and gravel. K did most of the hauling, so he gets full credit on that (we wound up thinning out the gravel a little from these pictures to use under the shed too, but you get the idea).

I spent some time adding more braces to reinforce the structure as well. Then, I began adding flashing tape.

In order for the flashing tape to stick, the surface needs to be clean and dry. However, this whole deck was built as the spring rain storms swept through, so that was much easier said than done. In Georgia, spring can often be a full day of threatening rain (but not actually raining), or intermittent storms, or blazing sun. It’s always a toss-up. Hard to plan for outdoor projects when the rain is exactly what needs NOT to happen in order to get to the next step!

Whenever the rain splashed dirt on the wood, we’d wait for things to dry out and then apply the tape. A cheap dish brush (that I’ve used for outdoor projects in the past) made quick work of getting things clean.

Since the weather wasn’t always the best assistant, there was a lot of skipping around. We basically spread out the gravel, applied flashing tape, and put in a bunch of braces between the joists all at once… whichever was the easiest to accomplish in the moment.

Building a deck over a concrete patio
I put off what I thought was going to be the hardest part until the end. I’d been reading and researching a lot on this part, and I found my answer on Family Handyman. In order to create a small section over the concrete patio, I would have to screw wood “sleepers” into the concrete. Then, after lining it up with the rest of the frame, I could add the decking on top.
But, once again, one of the more important things to keep in mind is wood touching (or rather, not touching) concrete. I had already built the new frame to have a gap between the outer frame and and the sides of the patio, to which I also added gravel. Then, we drilled a drainage hole in the corner and fit a plastic pipe through (this is potentially where we might try to run power in the future out into the yard, but we didn’t actually do any of that yet… it’s more of a “let’s plan to maybe do this just in case we want it later” type deal).

In my research, I found that if I put some type of composite/plastic product in between the wood and the patio, the deck would last longer. But the thinnest composite trim I was able to find at the store was still too thick to fit the 2×4 on top and still have it line up with the rest of the frame. Enter: plastic shims.
As a solution, I stacked the 2x4s on top of 1x4s (yes, Ground Contact!) and cut them to length at 45-degree angles. I then used the plastic shims to elevate them and get to the correct height.

Using a hammer drill and specialty drill bit (it comes with the concrete screws), I slowly found a way to screw through and line it up. Basically, I put the 1×4 in place and marked for screws every wo feet. Then, I pre-drilled through the wood with a normal drill bit. Next, I drilled through the hole with the concrete drill bit into the patio. This marked the hole in the right place so I could continue with just the hammer drill.
Tip: drill a little bit at a time and deeper than you’ll need. Pull the drill bit back out of the hole periodically to help remove dust and drilling the hole a little deeper will prevent the remaining dust in the hole from clogging things up when you fasten the screw down.
Once the 1×4 and shims were fastened to the patio, I stacked the 2×4 on top and screwed them into the 1×4.

In some cases, shims were needed multiple times, but the main objective was to get it all to line up with the rest of the frame.

You can see in the pic below that I had cut composite trim to attempt to use them as spacers… oh well! Guess now I have to find a use for a long piece of plastic trim that I can’t return (I already have an idea for use in the kitchen).

Once things were all in place, more flashing tape went on top (though I cut the roll in half this time instead of thirds, since the boards were wider here).
I also wrapped corners where I thought screw holes or joints would allow moisture.

And just like that, we were ready to start adding the deck boards! In the next post in this series, I’ll cover the decking process in detail, along with a nifty tool that worked extremely well and kept things evenly spaced. It was a little extra work to get an angled deck instead of laying the deck boards straight, but in the end, I think it’s totally worth it!

Thanks so much for following along, friends! I hope you found this helpful so far. If it’s beneficial to you, I’d love it if you subscribed for more updates so you don’t miss the next deck post. There will be a few DIYs in between that I’ve been meaning to cross off my to-do list for summer (plus, it’s nice to break things up, because it feels like my whole LIFE has been about this deck for the last month!  ), so you’ll see those next!
The post DIY Floating Deck, Part 2: Frame & Waterproofing appeared first on Ugly Duckling House.


No comments:
Post a Comment