Friday, June 29, 2018

Just When I Thought I Had Things Under Control…

Sigh… owning a house is great and all, but when there’s a leak in your ceiling? Ugh. Here’s how to prevent and clear a clogged air conditioning drain line.

Going to tell you right now: this story isn’t quite finished yet. I found a temporary solution, but I’m more or less going ahead and posting this so that someone will run up to their attic and immediately take care of this, before you have to deal with a ceiling leak.

Let’s start with what we all know is never a good sign: the dreaded ceiling stain:

stain on living room ceiling

I knew it couldn’t be good. I’ll be partnering with a drywall brand later this fall, and while I was at their headquarters earlier this month (recap coming next week), I heard a quote that proved to be way too ominous:

When it comes to owning a house, it’s not a matter of IF you’ll have a moisture issue. It’s WHEN.

Little did I know how true that was about to be. I’ve always said that my house has a sass all its own, and once again, she interrupted my plans. It was as though my house overheard that quote and manifested an example so I could have a story ready to go. I didn’t want to do a tutorial on ceiling stains, but my house is like, “Drywall? Ok, I got you, boo. Check this out!”

But this, of course, isn’t the project I wanted to do this fall — it’s something else that’s way more exciting and cool.

Frig friggity frig-frig — freaking dammit.

Anyway, I saw the leak and at first thought it might be a sweating/condensation issue. It’s been raining practically EVERY DAY this summer and humid beyond belief. So, I figured that turning the A/C up when we went to visit K’s parents the other weekend might have created a problem, similar to how I learned that leaving the door open might freeze up my A/C (as it turns out, your childhood scolding wasn’t just a “bought air” issue). Working on the deck and shed, I’ve certainly noticed how soggy everything in general has been this summer.

Not to panic, I thought. I‘ll just monitor it and let it dry out. If it did, I could just cover over the stain and be done with it and have learned a lesson. I also had one of K’s brother’s visiting overnight at the time, so I was in a frenzy and really couldn’t spend time thinking on it.

(Which is obviously stupid, because ceiling leaks don’t give a damn about your schedule.)

The next day, it started to drip. And I knew immediately it was a bigger problem. So, I grabbed a tarp and a cardboard box and started cutting the ceiling open. I certainly know enough to handle a drywall patch, so it was more of trying to protect ruining the floor more than anything.

cutting hole in ceiling

To humor myself, I put a neglected plant underneath the drip to give the plant a little water. 😉 Lemons —-> lemonade.

watering plant with ceiling leak

After K and I investigated the drip a little more, we had to keep cutting a hole to find the source. I  suspected that the leak might be further away, since the stain was forming right along a drywall seam (which would make it a path-of-least-resistance type thing, where water would seep through a vulnerable spot, even if the drip behind it originates somewhere else). The leak was coming from inside the house a spot closer to the actual wall/joists, near a duct.

revealing duct work

It occurred to both of us: if you go straight up from this point, it’s between two walls and directly in line with the air conditioner in the attic. DAMMIT. The more I cut, the more it became a steady flow.

filled bucket with water

Tip: If the drip is splashing on your floor, drape a towel over the bucket.

After looking through a number of articles online, YouTube videos, speaking to my dad, and more, it seemed the most likely culprit was a clogged AC condensation line.

How to Prevent a Clog in Your Air Conditioner’s Condensate Drain Line

The purpose of an air conditioner’s condensate drain line is kind of in the name: to drain excess water. As the HVAC system does its thing, water is produced, and it needs a drip line to take that water from the HVAC system in the attic or basement and outside the home (you know, where it won’t leak through your ceiling). You can often locate the end of this drip line outside, near your A/C unit.

There’s also often an overflow line and a drip pan underneath the indoor HVAC system, so that in the case that the line gets clogged, it will fill the pan and reach the overflow line and still run out of the house. So, why did I still have this issue?

attic access

Unfortunately, this whole setup usually doesn’t get much love until there’s damage. Clogs and blockages form from algae and mold buildup. Metal drip pans can rust through. To prevent this buildup, it’s recommended to use distilled vinegar or bleach and pour it into the line at an access point (there’s usually a valve somewhere along the drain line where you can open it and pour it in). Doing so on a regular basis (a good time is every spring just before turning on the A/C for the first time),  you should have no problem. If you ever hear a gurgling, or bubbling sound behind your wall, this would be a good time to check too.

But get this: even if you hire someone to regularly service your HVAC system each year, this is commonly forgotten to be checked on. So first, you have to know about this to even ask the person if they checked it. Anyone see the problem with that???

How to Clear a Clogged Air Conditioning Drain Line

You Might Need

Steps

  1. Turn off the A/C power at the thermostat and the breaker.
  2. Locate the drip pan beneath the HVAC system. If it’s got standing water in it, you probably have a clog. Shop vac it out or use a towel to soak up the water. I sincerely doubt you will, but you should also clean the pan with soap while you’re at it.
  3. Go outside and locate the end of the drain opening. Use the shop vac again for a minute or two (put your hand around the valve and end of the shop vac if you want to improve suction, or use some super cheap dollar-store duct tape that never sticks well to anything when you want it to). You might hear debris getting sucked up, but check the shop vac’s contents if you’re not sure. You might also see some really gross sludge fall out of the line.
  4. Locate the access valve (if there is one). It will look like a T-shaped vent with a PVC cover. Using a funnel, small cup with a spout, or similar (I used a watering can with a really narrow mouth), pour a little distilled vinegar or bleach into the line.
  5. Allow it to sit for a little while (go watch an episode on Netflix & come back), then flush with water. Have someone outside on the phone with you when you do this to confirm if the line is now clear.
  6. If the above doesn’t work, you can try snaking the clog, blasting it with a canister of air (my dad does this), or calling a pro (hopefully a guy who will remember to check this for you the next time he services your system).

drain line gun

In my case, not only was my line clogged, but:

hvac condensate drain lines

  • My drip pan was rusted through in one spot. That’s what was causing it to leak in the house, because water wasn’t catching where it should have been.
  • Even if I had known about this prior, my drain line setup had no valve to pour anything into. While this might still work if you can remove the fitting on the edge of the drain pan, mine was stuck on tight and really awkward to move in its current layout. So, we had to cut the line and reroute the water flow temporarily into the overflow drain line.
  • Drain lines are recommended to be slightly titled at a downward angle to better assist with water flow. Guess what — nope.
  • There are a number of turns in mine, so the clog has been building up slowly for years.

What’s next:

As I mentioned, my tale is not quite over yet, but at least we have the A/C running and I’m confident we’ll be able to get this fixed. We’ll need to clear the clog and reroute the drain line back to normal, add an access valve, and replace the drip pan. We’ll probably also look into installing an overflow sensor in the overflow line, so we can be alerted in case it happens again (yay, technology!).

Oh yeah — and patch the hole in the living room ceiling. I’ll have that tutorial for you sometime in the future.

So, now you know! I hope this info someday helps someone prevent a clog and an expensive repair bill. If it does, please come back here and tell me so I know I prevented damage in the process of earning mine. 😉

bucket and towels

The post Just When I Thought I Had Things Under Control… appeared first on Ugly Duckling House.

More Where That Came From

How to Fix a Leaking Outdoor Faucet
Via Home Improvement http://www.rssmix.com/

DeWalt DCK287D1M1 Combo Kit Double Feature – Hammer Time vs. Sudden Impact

DeWalt DCK287D1M1

This post is sponsored by The Home Depot. Whether you’re a pro or a serious DIYer, you’re probably resigned to the fact that cordless tools will soon rule the world. With advances in brushless motor and lithium-ion battery technology, cordless tools often have the same – or greater – power as their corded counterparts. WhenRead More

The post DeWalt DCK287D1M1 Combo Kit Double Feature – Hammer Time vs. Sudden Impact appeared first on Home Fixated.

Via Home Improvement http://www.rssmix.com/

Thursday, June 28, 2018

#285: 3 Reasons Multifamily Rentals Might Be the Perfect Investment with Paul Moore

Is there such thing as a “perfect investment?” According to today’s guest, yes. Today on the BiggerPockets Podcast we sit down with Paul Moore, a real estate investor whose 18-year journey through real estate has included house flipping, new construction, hotels, and finally—multifamily. In this episode, Paul shares three powerful reasons why multifamily might just be the most perfect real estate investment. You’ll learn how Paul discovered the vital difference between investing and speculating, why falling in love (with a deal) is incredibly dangerous, and the huge real estate gamble that Paul made that cost him $40,000. If you plan to eventually buy small multifamily properties, this is one podcast episode you can’t miss!

Links from the Show
Via Home Improvement http://www.rssmix.com/

Sunday, June 24, 2018

The Dust Right Dust Collector By Rockler – It Sucks So Good

Rockler Dust Right

How could we title a dust collector review without an “it sucks” pun? And why would we want to? Dust is a pernicious woodshop nuisance that gets on and in absolutely everything, including your lungs. Luckily, the suction of Rockler’s Dust Right can vastly improve the air quality in your shop and keep those 600Read More

The post The Dust Right Dust Collector By Rockler – It Sucks So Good appeared first on Home Fixated.

Via Home Improvement http://www.rssmix.com/

Friday, June 22, 2018

Mini Garden Deck | Scrap Deck Boards Made Useful

This “mini garden deck” made from scrap deck boards has already made a huge difference in keeping my feet dry around the new vegetable garden.

Hey everyone! As you saw from yesterday’s deck update, I’ve been spending a lot of time outside. Between that, the new vegetable garden, and the new shed build, I’ve been in a summer state of mind for quite some time. I’ve also kind of HAD IT with walking on muddy dirt patches (Georgia’s spring rains this year have been nuts!). With summer officially starting today, and with plenty of scrap deck boards around, I decided to hop in with the #scrapwoodchallenge and created my own solution for better garden maintenance. I’m calling it my “mini garden deck” 😎!

diy mini garden deck

My new vegetable garden bed has been a learning process. One part of that has been realizing that this area is going to get a lot of upkeep-related foot traffic.

green tomato

So, as proud as I am of how well things are going, I have noticed a major drawback: frequent visits have made the inner triangle of the L-shaped garden bed a little dirt-rich and grass-poor. I put down some landscaping fabric intending on eventually covering it with gravel, but then realized how well the leftover deck boards could solve the problem… without an additional materials purchase!

Recommended Tools and Materials

may contain affiliate links

The deck boards I used are designated for Ground Contact, which is recommended for wood projects that sit within six inches of the ground. You can find more about that here.

How to make a mini garden deck from scrap wood

Start in the middle

Keeping in mind that this was scrap, I basically took the materials available. I bought stair balusters and wound up not needing them, and I’m kind of terrible about returning leftover materials. I used these as stringers for fastening the deck boards together. Many had been cut already to fit the floating deck (and therefore could not be returned), but some were long enough pieces where they could be reused.

stair balusters on landscaping fabric

Since I was kind of winging it, I placed the stair balusters on the ground, on top of the landscaping fabric and spread them out, fanning in a sort of triangle shape. These would be what I would screw the deck boards to. If you’ve ever seen a wooden sign and looked on the back, it’s a pretty similar concept (such as here and here).

basic concept of mini garden deck

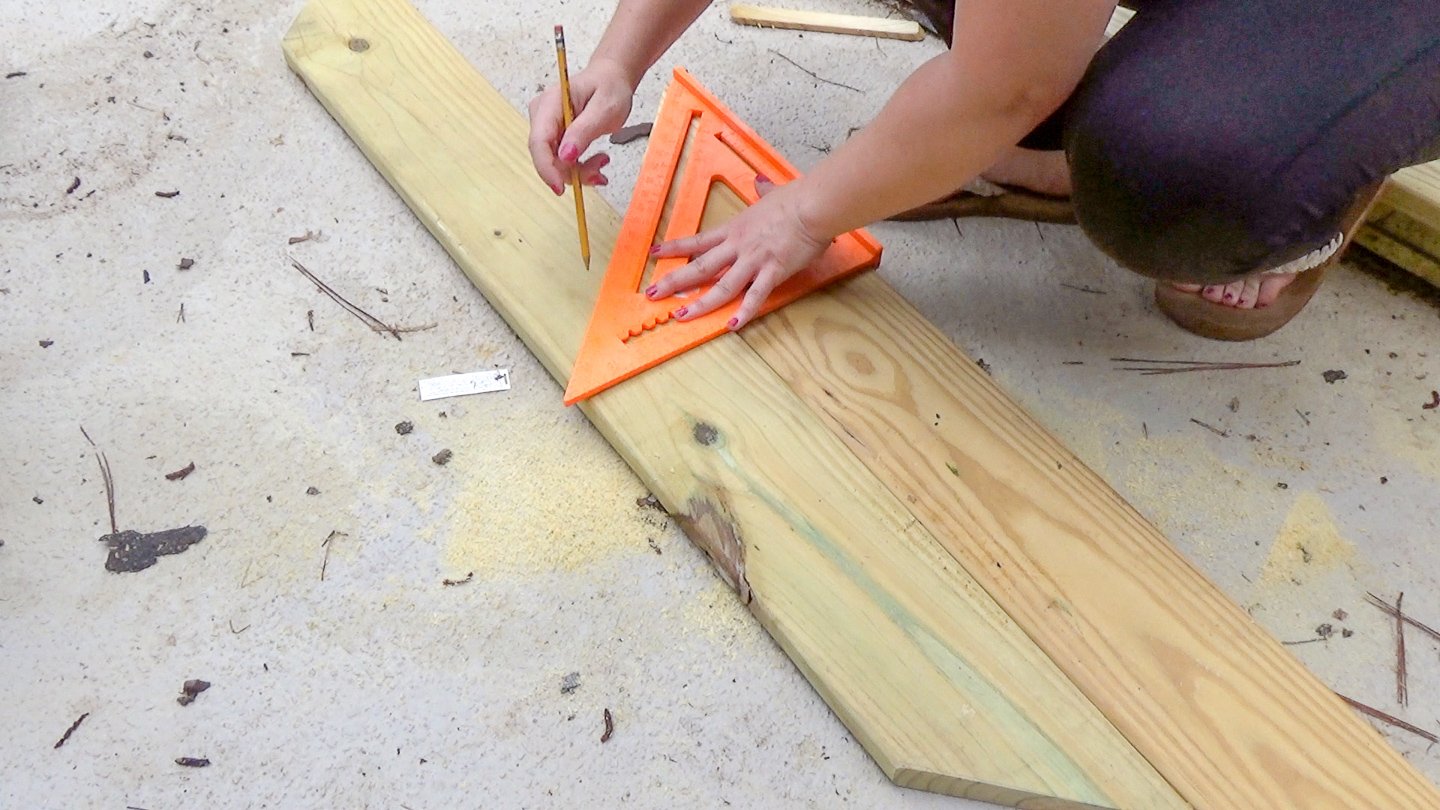
I began where I thought would be the middle (ish) of the L-shaped area, and cut my deck board at 45-degree angles on both ends.

45 degree angles for mini deck

From this, I cut more pieces to help form a triangle shape until the space was filled. I dry fit each board into place and then began fastening them to the strips underneath.

dry fit of mini deck

Spacing

For spacing, I used some old plastic spacers I bought a long time ago for installing the laminate flooring in my house (just held onto them, because I just knew they’d be useful again 😉). If you don’t have something like this, insert a few nails between the boards — anything that will serve as a temporary wedge to provide a small gap. You’re mainly looking for spacing to allow the wood to expand and contract with moisture fluctuations.

spacing of first 4 middle boards

Screw together and fan out

I screwed in the first board on both ends where it met the stringers from the top down (2 screws on each end of the board, 2 screws down the middle). When the board was attached and spacing set, I moved the spacers to the next gap and fastened the next board. So on, and so on, until the entire triangle was complete.

using spacers

If you were to look at the back, it would look like a hot mess — the stringers (the stair balusters) that attach to the deck boards are practically random in their placement.

inside corner of mini deck

But since you’ll never see them, all that really matters is that they are enough material to hold the entire thing together. Since the ground was soft from the frequent rain, I merely needed to stand on it the new platform to sort squish into the ground and hold in place. The corner was kind of an awkward spot with how narrow it got, so working an extra piece of the baluster (vertically) into the corner was a perfect fit.

inner corner of mini deck

And boom: no more muddy feet when maintaining the garden. It actually kind of finishes the area nicely, too.

overall look of vegetable garden

There’s still a little more work to be done to make the widest end look more finished, but since I still have the shed build left to complete, I’ll wait to use up the remaining full-length deck boards before re-purposing one for the garden bed. This whole area is going to look so great!

I just love scrap wood projects… so feel free to do a little looking around at the links on this list. Jen from House of Wood asked a bunch of us to share some scrap ideas, and there’s LOTS more below!

Check out these other awesome Scrap Wood projects:

The post Mini Garden Deck | Scrap Deck Boards Made Useful appeared first on Ugly Duckling House.

More Where That Came From

How to Build a Concrete Form for an Outdoor Pad
The Gardenia Garden Beds Are Thriving!
Growing Seedlings for My First Veggie Garden
Simple DIY Tricks for Covered Porch Plants
Via Home Improvement http://www.rssmix.com/

DIY Floating Deck, Part 2: Frame & Waterproofing

I’m building a floating deck in my back yard! Catch the whole thing, start to finish, right here.

Hey guys! It’s time for the next post in this long-awaited (at least, for me!) update. I’ve finally gotten enough coffee in my system and quieted the dogs long enough to finish this post and give you another written + video combo.

Brace yourselves, we’ve got a lot to cover!

If you recall from the first post where I talked about the deck plan, I shared the overall design, explained some of the decision making that went in, and where my challenges/research led.

deck - full lumber version

Once I’d come up with my overall plan… it was time to get to work!

Recommended tools and materials

May contain affiliate links or links to related posts

Ground Contact lumber

One of the biggest new pieces of info I picked up as I made my deck plan was discovering that I would likely need to use Ground Contact lumber for the entire project. I was excited to bring Wood Its Real onboard as a sponsor, and I’m so glad I did when I did, because it was through them that I learned about these new recommendations.

As common sense would tell you, outdoor wood projects need more protection than the stuff you’d use on the interior. And most of you probably also know about using “pressure treated” or PT wood for common outdoor projects to make them last longer. But as of 2016, there are new guidelines designating what kind of pressure-treated lumber should be used, and when. As you might guess, part of it is in the name. Since termites and fungi and all sorts of nasty critters live in the ground, that type of contact is especially important to protect against. There are a few other scenarios where Ground Contact is recommended:

  • Wood will come in contact with soil, vegetation, leaf litter, and debris that can hold moisture for extended periods of time.
  • You don’t expect good air circulation, especially on the underside and between decking boards.
  • Wood components are installed less than six inches above the ground and are supported by treated wood or concrete without a moisture-transferring barrier/break.
  • Wood is in direct contact with material that already shows signs of decay.
  • Wood gets wet on a very frequent, recurring basis and doesn’t have time to dry adequately.
  • You are building in a tropical climate.

Well, whaddya know… my new deck is going to meet a LOT of that criteria!

I noticed that my local Lowe’s was kind of half-and-half about having Above Ground and Ground Contact lumber, but the nearby Home Depot seems to have switched out almost all of theirs for Ground Contact. Honestly, it makes sense with a store’s limited shelf space.

unloading lumber from truck

Lumber hanging out back

Building a floating deck frame

Build outer frame

I began by cutting and building the outer frame. I could have started with the deck blocks and supports and laid it all out, but for whatever reason, this way just seemed to make more sense to me.

create outer deck frame

For the outer frame, I pre-drilled each hole and used exterior screws. Don’t waste your time like I did! Use exterior screws that don’t need pre-drilling. Like the Ground Contact lumber, you spend a little more for better quality materials. It’s worth it.

build exterior frame of deck

Elevate and level out

The frame, at this point, was screwed together, but it was still a rickety mess. To keep the corners square, I reinforced them with a piece of scrap lumber. I would later discard these once the rest of the frame and other supports went in.

corner brace to keep square

I also lifted up the frame using some scrap lumber and my 4-foot level (one of my favorite hand-me-downs from my grandfather). It’s normal for things like this to still have a  s l i g h t  slope for water runoff (it only looks level, but isn’t), so I noted the way the level looked when laying it on the patio and tried to match the same slope with the deck frame.

Space out supports

I marked every 16 inches and placed another 2×6 in the frame. The longest boards I brought home were 12 feet, but the deck is longer at one end. So, I added another board a couple of feet from the end to give the 12-foot boards something to screw into. Kinda easy, but it helps to have someone assist by holding up all the other ends.

floating deck at night

At all corners and in the one spot where I used a 4×4 to help elevate the deck, I added self-tapping structural screws (at this point, I finally bought better ones that didn’t require pre-drilling). For the rest of the structure, I went back through and secured with self-tapping 3 1/8″ fasteners (you can just do this the first time and avoid the double effort!). I also added some stainless steel brackets on some of those joists that I thought were high enough off the ground to add it.

Note: hardware not pictured — I did a lot of second-guessing myself at one point and chose to add more hardware/brackets on the joists of the highest side as the deck boards went on. But since some of my research argued against using it in areas with direct ground exposure, I used them only where I thought applicable. I can really only say “use your best judgment and consult a structural engineer” if you have questions, since this is still my first time building something like this —  and, of course, I’m a homeowner messing with her own house, not a professional contractor. This thing mostly sits on the ground, so I’m not super worried about falling down and/or not lasting for as long as I want it. But as with any large build, one tutorial is never enough! It’s always best to read multiple tutorials and make the most informed decision possible. <3

Waterproofing a deck

Somehow, a deck, the Wicked Witch, and cotton candy have the same greatest foe: water.

To combat this (at least, in the deck’s case), there are a number of different options. While we may call this “waterproofing”, what we’re really talking about is adding moisture barriers to help the wood dry out as quickly as possible. Rot is still a natural inevitability with just about everything; we’re just trying to prevent that as best we can. They’re all good suggestions, but doing a combination of more than one seemed like the right option for me:

  • Using ground contact lumber (6 inches or less above ground, in contact with concrete, etc.) – ✔
  • Laying down landscaping fabric and gravel under the deck – ✔
  • Brushing a sealant on cut joist ends
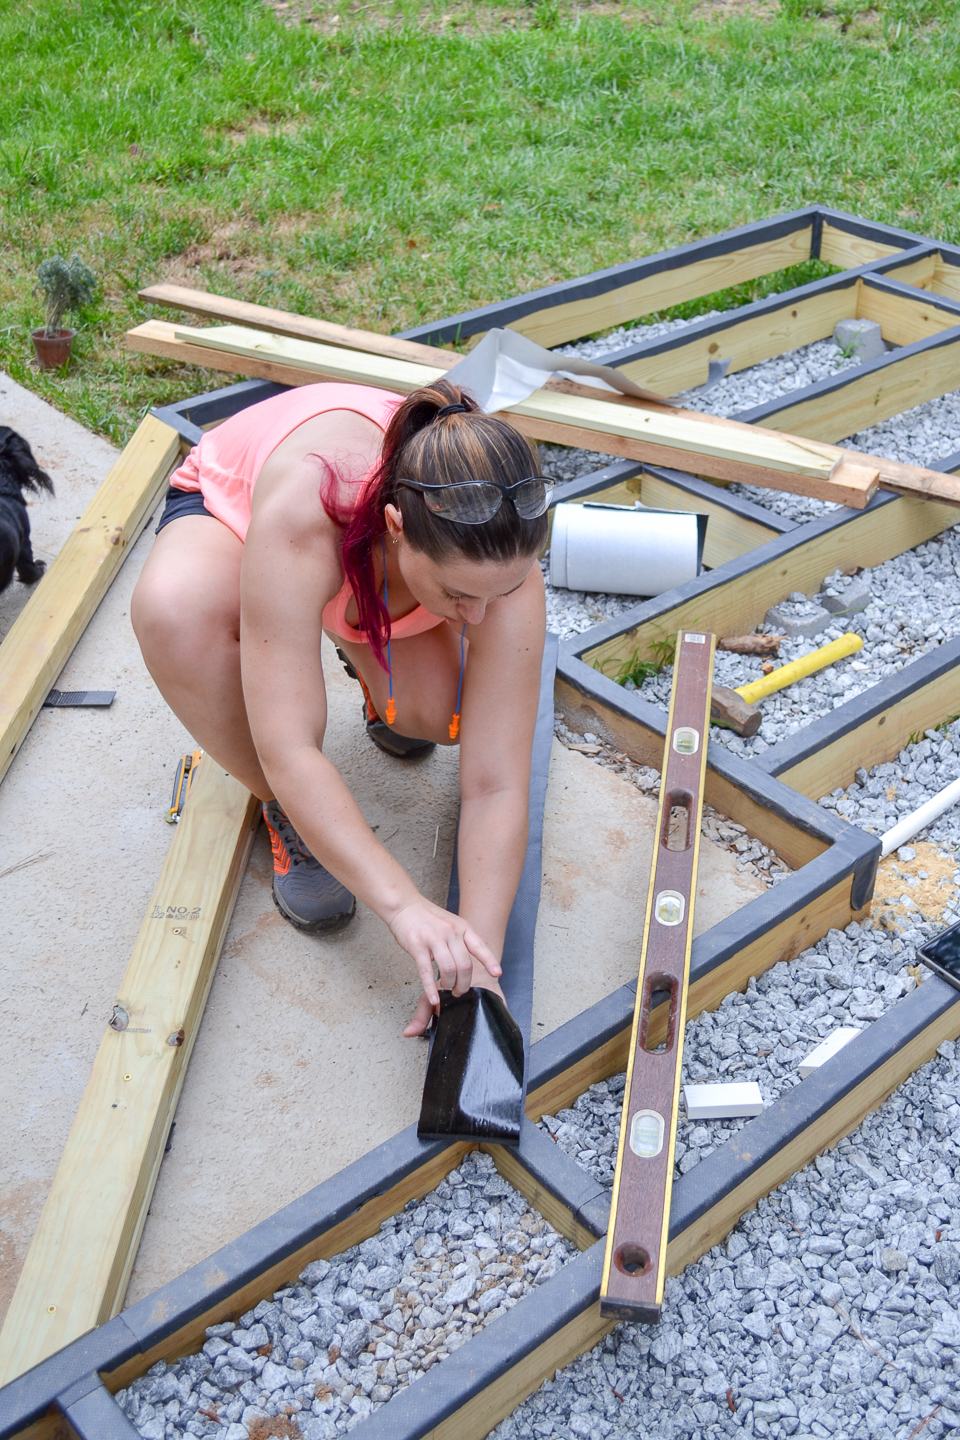
  • Using flashing tape on the frame (prevents water from sitting in between the deck boards and the joists) – ✔

After spacing out the deck blocks and digging them down, I surrounded everything with landscaping fabric and gravel. K did most of the hauling, so he gets full credit on that (we wound up thinning out the gravel a little from these pictures to use under the shed too, but you get the idea).

add in landscape fabric

I spent some time adding more braces to reinforce the structure as well. Then, I began adding flashing tape.

frame right side

In order for the flashing tape to stick, the surface needs to be clean and dry. However, this whole deck was built as the spring rain storms swept through, so that was much easier said than done. In Georgia, spring can often be a full day of threatening rain (but not actually raining), or intermittent storms, or blazing sun. It’s always a toss-up. Hard to plan for outdoor projects when the rain is exactly what needs NOT to happen in order to get to the next step!

waterproofing flashing tape

Whenever the rain splashed dirt on the wood, we’d wait for things to dry out and then apply the tape. A cheap dish brush (that I’ve used for outdoor projects in the past) made quick work of getting things clean.

floating deck frame left side

Since the weather wasn’t always the best assistant, there was a lot of skipping around. We basically spread out the gravel, applied flashing tape, and put in a bunch of braces between the joists all at once… whichever was the easiest to accomplish in the moment.

build a floating deck

Building a deck over a concrete patio

I put off what I thought was going to be the hardest part until the end. I’d been reading and researching a lot on this part, and I found my answer on Family Handyman. In order to create a small section over the concrete patio, I would have to screw wood “sleepers” into the concrete. Then, after lining it up with the rest of the frame, I could add the decking on top.

But, once again, one of the more important things to keep in mind is wood touching (or rather, not touching) concrete. I had already built the new frame to have a gap between the outer frame and and the sides of the patio, to which I also added gravel. Then, we drilled a drainage hole in the corner and fit a plastic pipe through (this is potentially where we might try to run power in the future out into the yard, but we didn’t actually do any of that yet… it’s more of a “let’s plan to maybe do this just in case we want it later” type deal).

use hammer drill to drill into concrete patio

In my research, I found that if I put some type of composite/plastic product in between the wood and the patio, the deck would last longer. But the thinnest composite trim I was able to find at the store was still too thick to fit the 2×4 on top and still have it line up with the rest of the frame. Enter: plastic shims.

As a solution, I stacked the 2x4s on top of 1x4s (yes, Ground Contact!) and cut them to length at 45-degree angles. I then used the plastic shims to elevate them and get to the correct height.

use hammer drill

Using a hammer drill and specialty drill bit (it comes with the concrete screws), I slowly found a way to screw through and line it up. Basically, I put the 1×4 in place and marked for screws every wo feet. Then, I pre-drilled through the wood with a normal drill bit. Next, I drilled through the hole with the concrete drill bit into the patio. This marked the hole in the right place so I could continue with just the hammer drill.

Tip: drill a little bit at a time and deeper than you’ll need. Pull the drill bit back out of the hole periodically to help remove dust and drilling the hole a little deeper will prevent the remaining dust in the hole from clogging things up when you fasten the screw down.

Once the 1×4 and shims were fastened to the patio, I stacked the 2×4 on top and screwed them into the 1×4.

use grk screws to attach 2x4 to 1x4

In some cases, shims were needed multiple times, but the main objective was to get it all to line up with the rest of the frame.

elevate the frame boards with plastic shims

You can see in the pic below that I had cut composite trim to attempt to use them as spacers… oh well! Guess now I have to find a use for a long piece of plastic trim that I can’t return (I already have an idea for use in the kitchen).

build a floating deck

Once things were all in place, more flashing tape went on top (though I cut the roll in half this time instead of thirds, since the boards were wider here).

add flashing tape to all of the frame

I also wrapped corners where I thought screw holes or joints would allow moisture.

cut flashing to fit

And just like that, we were ready to start adding the deck boards! In the next post in this series, I’ll cover the decking process in detail, along with a nifty tool that worked extremely well and kept things evenly spaced. It was a little extra work to get an angled deck instead of laying the deck boards straight, but in the end, I think it’s totally worth it!

Charlie resting on new deck

Thanks so much for following along, friends! I hope you found this helpful so far. If it’s beneficial to you, I’d love it if you subscribed for more updates so you don’t miss the next deck post. There will be a few DIYs in between that I’ve been meaning to cross off my to-do list for summer (plus, it’s nice to break things up, because it feels like my whole LIFE has been about this deck for the last month! 🤣), so you’ll see those next!

The post DIY Floating Deck, Part 2: Frame & Waterproofing appeared first on Ugly Duckling House.

More Where That Came From

Quick Patio Patch
4 Easy Tips for Growing Hydrangeas
How to Make Your Patio Look New Again for Less Tha...
Game of Stones
Via Home Improvement http://www.rssmix.com/

Everything I Know About Hydrangeas

Thursday, June 21, 2018

Mini Garden Deck | Scrap Deck Boards Made Useful

This “mini garden deck” made from scrap deck boards has already made a huge difference in keeping my feet dry around the new vegetable garden.

Hey everyone! As you saw from yesterday’s deck update, I’ve been spending a lot of time outside. Between that, the new vegetable garden, and the new shed build, I’ve been in a summer state of mind for quite some time. I’ve also kind of HAD IT with walking on muddy dirt patches (Georgia’s spring rains this year have been nuts!). With summer officially starting today, and with plenty of scrap deck boards around, I decided to hop in with the #scrapwoodchallenge and created my own solution for better garden maintenance. I’m calling it my “mini garden deck” 😎!

diy mini garden deck

My new vegetable garden bed has been a learning process. One part of that has been realizing that this area is going to get a lot of upkeep-related foot traffic.

green tomato

So, as proud as I am of how well things are going, I have noticed a major drawback: frequent visits have made the inner triangle of the L-shaped garden bed a little dirt-rich and grass-poor. I put down some landscaping fabric intending on eventually covering it with gravel, but then realized how well the leftover deck boards could solve the problem… without an additional materials purchase!

diy mini garden deck

Recommended Tools and Materials

may contain affiliate links

The deck boards I used are designated for Ground Contact, which is recommended for wood projects that sit within six inches of the ground. You can find more about that here.

How to make a mini garden deck from scrap wood

Start in the middle

Keeping in mind that this was scrap, I basically took the materials available. I bought stair balusters and wound up not needing them, and I’m kind of terrible about returning leftover materials. I used these as stringers for fastening the deck boards together. Many had been cut already to fit the floating deck (and therefore could not be returned), but some were long enough pieces where they could be reused.

stair balusters on landscaping fabric

Since I was kind of winging it, I placed the stair balusters on the ground, on top of the landscaping fabric and spread them out, fanning in a sort of triangle shape. These would be what I would screw the deck boards to. If you’ve ever seen a wooden sign and looked on the back, it’s a pretty similar concept (such as here and here).

basic concept of mini garden deck

I began where I thought would be the middle (ish) of the L-shaped area, and cut my deck board at 45-degree angles on both ends.

45 degree angles for mini deck

From this, I cut more pieces to help form a triangle shape until the space was filled. I dry fit each board into place and then began fastening them to the strips underneath.

dry fit of mini deck

Spacing

For spacing, I used some old plastic spacers I bought a long time ago for installing the laminate flooring in my house (just held onto them, because I just knew they’d be useful again 😉). If you don’t have something like this, insert a few nails between the boards — anything that will serve as a temporary wedge to provide a small gap. You’re mainly looking for spacing to allow the wood to expand and contract with moisture fluctuations.

spacing of first 4 middle boards

Screw together and fan out

I screwed in the first board on both ends where it met the stringers from the top down (2 screws on each end of the board, 2 screws down the middle). When the board was attached and spacing set, I moved the spacers to the next gap and fastened the next board. So on, and so on, until the entire triangle was complete.

using spacers

If you were to look at the back, it would look like a hot mess — the stringers (the stair balusters) that attach to the deck boards are practically random in their placement.

inside corner of mini deck

But since you’ll never see them, all that really matters is that they are enough material to hold the entire thing together. Since the ground was soft from the frequent rain, I merely needed to stand on it the new platform to sort squish into the ground and hold in place. The corner was kind of an awkward spot with how narrow it got, so working an extra piece of the baluster (vertically) into the corner was a perfect fit.

inner corner of mini deck

And boom: no more muddy feet when maintaining the garden. It actually kind of finishes the area nicely, too.

overall look of vegetable garden

There’s still a little more work to be done to make the widest end look more finished, but since I still have the shed build left to complete, I’ll wait to use up the remaining full-length deck boards before re-purposing one for the garden bed. This whole area is going to look so great!

I just love scrap wood projects… so feel free to do a little looking around at the links on this list. Jen from House of Wood asked a bunch of us to share some scrap ideas, and there’s LOTS more below!

Check out these other awesome Scrap Wood projects:

The post Mini Garden Deck | Scrap Deck Boards Made Useful appeared first on Ugly Duckling House.

More Where That Came From

How to Build a Concrete Form for an Outdoor Pad
The Gardenia Garden Beds Are Thriving!
Growing Seedlings for My First Veggie Garden
DIY Floating Deck, Part 1: Planning and Layout
Via Home Improvement http://www.rssmix.com/

#284: The “Miracle” Behind Becoming a Millionaire with Hal Elrod and David Osborn

Wealth is not an accident, it’s a choice. And on today’s powerful episode of The BiggerPockets Podcast, you’ll learn exactly how to make that choice each and every day. We’re excited to bring back two return guests, Hal Elrod and David Osborn, to talk about the choices that wealthy people make to ensure they stay focused on reaching their goals. You’ll hear about Hal’s recent battle with cancer and the mindset that allowed him to overcome the odds and live. You’ll discover how your diet can make you wealthy and how to command your day from the moment you wake—even if you aren’t a morning person. And you’ll discover the powerful concept of having an “air game” in addition to your “ground game”—and how understanding the distinction can make you wealthier than you have ever dreamed. Packed with wisdom, humor, and incredible insight, this show will leave you pumped up and ready to choose wealth.

Links from the Show
Via Home Improvement http://www.rssmix.com/

524: 3 Sales Secrets That Will Help You Close Your First or Next Deal

A decade ago, Chandler David Smith was a broke college student. After searching for jobs, he was given the opportunity to try his hand at d...