In February, I created a booth for Rust-Oleum at the first-ever Workbench Con. And in true UDH fashion, it became a crazy story all its own.
For more than eight years (April 1st was my blogiversary, actually), I have spent time regularly updating this blog, (mostly) all about my ups and downs of DIY home remodeling. It’s been about individual projects aplenty, but most of all, it’s been about the journey. It has taken years to build a home I love, and there’s more yet to do. Through that, I created a business I’m passionate about. And even more astonishing to me, I created a brand that is recognized by companies I admire.

And? That’s all super, super surreal. Frequently. Because things come at ya fast, and you wind up saying yes to things you can still fail at because you’ve never really done them before. That’s how I wound up building a brand booth at a conference that took over my kitchen and living room and made my new roommate wonder what the hell he’s gotten himself into. 
Booth & conference backstory
Over the winter, I was asked by Rust-Oleum — a brand that I’ve used so. many. times. and even featured as some of my first projects — to build their booth at the first-ever Workbench Con in Atlanta, GA. You guys have heard me talk about Haven before, and this conference is sort of like its rough-around-the-edges cousin. More focused on woodworking, set up in a warehouse instead of hotel ballrooms, and more influencers of all kinds (Haven is mostly blog-focused, while this also drew YouTubers and Instagrammers and such, who collectively refer to themselves as “makers”).
For a new conference, I didn’t really know what to expect or what other brands might be bringing to the table. I mostly had Haven as reference, which meant I needed to bring my A-game! I knew Rust-Oleum had previously asked bloggers to create booths for other conferences in the past, such as when Bower Power did it for Haven in 2016. I never thought I’d ever get an opportunity like that.
They asked me to help with the event since I was local, and sent me a few of their ideas to work with. I came back with my design concept, and they agreed! Part of what I was commissioned to do was to showcase some specific new products. One of these is a product designed to chemically mimic the look of aged wood (I nerded out a little with some of the Rust-Oleum reps while setting up, and they have some real smarties in product development). Neat.

Rising above self-doubt
As you might expect, when faced with a totally new challenge and completely unanticipated circumstances, I had a lot of self-sabotaging thoughts leading up to the conference.
- I’m not really “into” farmhouse/rustic style, and didn’t know if I could take my own style and still give Rust-Oleum something that would showcase well. After all, this was about them making their product look good, and I really wanted to do that job well. (I later changed my mind about the product once I started using it, and may even like it better than regular stain now.)
- I was intimidated by the fact that the conference was targeting woodworking experts; would my beginner-level skills hold up to their discerning eyes?
- I’d never built furniture meant to be transported before; what if the whole darn thing fell apart before I even got there? Exactly how crazy am I to agree to this?
Still, with a whole lot of ambition — and perhaps naive enthusiasm — I said yes. I gratefully said yes, because it sounded like something that would be too cool to pass up. I knew I would always regret turning it down… and would challenging myself be so bad? As long as I put in the work, I would gain new experience and possibly the chance to shout “Look at what I made!! It’s so cool!!!” from the rooftops.
Battling fear with research
As I do with my house renovation projects, I went into research mode. I asked the event organizer for a breakdown of what was to be expected, and to physically see the warehouse before the event to get a better minds-eye for what I needed to do. I even called Katie from Bower Power to get her behind-the-scenes take at Haven; I furiously took down notes and came up with my game plan.


Getting to work
Rust-Oleum sent a huge shipment of products to my door to help me create the booth. The overall plan involved living elements, lighting, and lots of texture. From Rust-Oleum’s product line, I used stain, the wood accelerator product, and lots of spray paint.
Here’s where the first part of my plan goes awry, though: it was a few weeks before the conference, and the weather predicted nothing but RAIN until the day of. For weeks!! And I really needed to work outside with stain and spray paint. My kitchen had just undergone a mini-makeover with new appliances, and the garage was full of the old ones until I could sell them off. My boyfriend was right in the middle of moving all of his stuff into the house, and we’d just cleared out the guest bedroom for renovation. I had basically no workshop, and without the weather cooperating, no option to work outside. Womp-womp.
I waited as long as I thought possible (in vain), hoping the weather would allow me to stain and paint outside. Short of that, I started building in the living room.
The living room takeover
Starting with the back of the booth, I built frames out of 2x4s and ripped down large sheets of 1/4″ oak plywood into strips. I matched them all up to form a chevron pattern on each wall segment.

The general idea was to build in sections. This way, I could lift and move them into the warehouse myself. About a day before the conference, the sky gave me a short reprieve so I could cut down the plywood overhanging each segment and stain them all. I know this will sound like a cheesy product plug to say it, but part of the reason why I like Rust-Oleum/Varathane stains is because of the short dry time. This was probably not the exact reason for engineering them that way, but it made the difference between finishing and not finishing on time.

The kitchen takeover
With the panels for the back wall taking up all available space in the living room, I created the booth table and storage in the kitchen.

Creating the chevron pattern for the wall meant cutting off excess along the sides of each panel. These leftover cutoffs didn’t go to waste. Instead, I tacked them onto the front of the booth to create a layered wood effect. This was partly inspired by the West Elm store in Ponce City Market, one of my favorite local spots with that same industrial-chic vibe (lots of shops and really unique eateries).

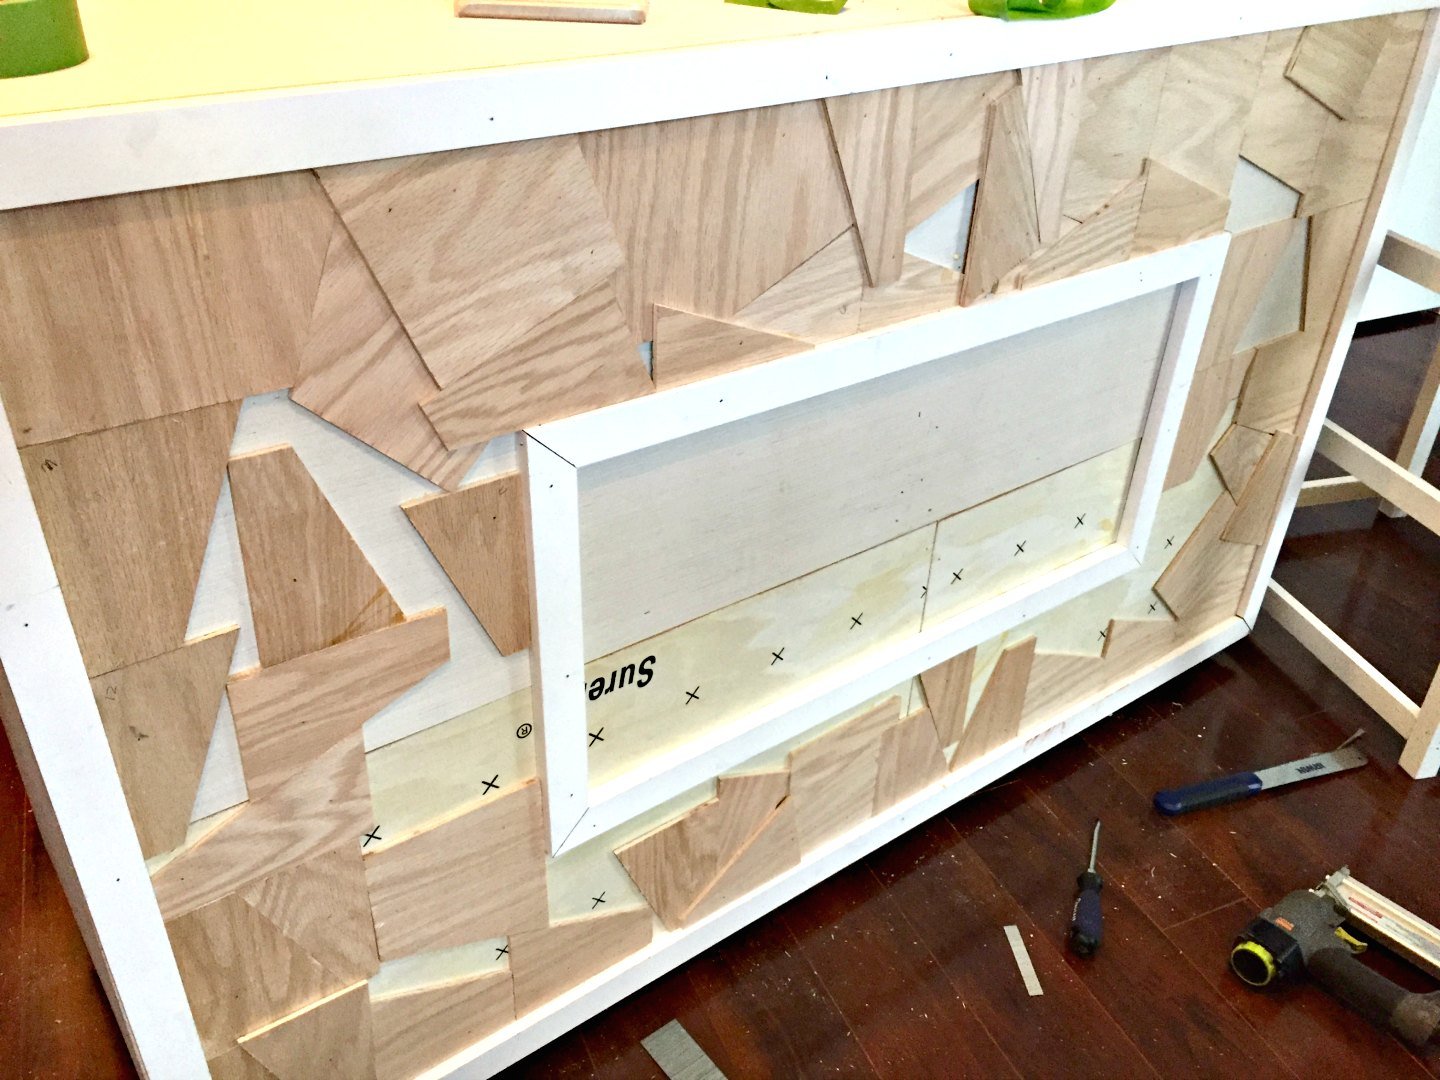
For the top and front of the booth table, I used pre-painted MDF for the trim and stained the plywood with the new aged wood accelerator. This is where I was pleasantly surprised: I loved the look! It’s water-based and went on beautifully, no matter how sloppy I had to get to fit my brush into all the little nooks and crannies of the layered wood. Unlike stain where you would wipe on/off, with this you just put it on and let it work its magic. Truly fun to see it work into the wood grain and the rich color it creates.

The hallway takeover
For the back wall, I was tasked to show off some of Rust-Oleum’s spray paint line. I was eager to use my new scroll saw that I received for Christmas, so I cut out each letter of Rust-Oleum’s logo and mounted it to a wooden sign. The letters were spray painted white, while the back was metallic. I thought it fun to make the square grid of their logo carry the living element theme, so I placed succulents inside (to be mounted when installed).
![]()
There were other little extras, like converting some square planters into wall mounted ones, getting each piece ready to assemble and hang day of, etc. I just barely finished in time. Even though I’m proud of what I accomplished, I will always wish I could have done more.
The booth!
The day of installation, it was a mad rush to load everything onto a rental truck (K had helped me load a few items the night before, but there were still lots of big pieces to load next day on my own — and unload, of course!), wheel it all into my designated booth spot, and set up. And here it is!

I also want to say a special thank you to my friends, Charlotte (yes, my Dueling DIY nemesis!), Erin Spain, and Yuni from Love Your Abode for helping me finish! They came by for some words of encouragement and to say hello, and got roped into helping (knowing full well I’d put ’em to work). Thank you, ladies!

I took a few clips while I was at the conference, so while this video really won’t make much sense, you can see more of the “real” look at the conference and everything around us.
Here’s the crazy part
The rest of the conference went by in a flash, and it was just as most conferences tend to go: lots of meeting new people, lots of seeing familiar faces, and lots of learning. It was a great conference, and I’m planning on coming back in 2019!
As part of building the booth for Rust-Oleum, they also wanted me to disassemble after the conference and drop it off to one of their local buildings for future use (part of the reason I tried to build things in separate parts, so it could be shipped later). Right after the conference closing ceremonies ended and all the giveaway prizes were handed out, I grabbed my rental truck and returned back to the booth to take it apart. Only part of it had mysteriously been done for me. It cracks me up now, but in the moment, I was panicked.
Somehow, in the chaos of the other brands taking apart their booths, there had been a miscommunication that Rust-Oleum had left their booth behind for the conference crew to take apart. Who, in turn, encouraged attendees to take as much as they would like home with them (makes sense, since it’s less work to haul away). Since I had made everything deliberately to be taken apart in pieces for shipping, I suppose I made that extra easy. So the plants, planters, and all the smaller decorative items, including the lights on the back wall, had all disappeared.

I called the Rust-Oleum team to let them know of what happened, and later even learned of where some of the items wound up (one of the conference attendees even sweetly offered to ship me back what they had taken after seeing my post on Instagram, wishing a new happy life to the objects that had walked away  ).
).
I swear, this is the kind of thing that would only happen to me. I am forever grateful for this experience — even the nutty story.

Two inspired pieces
But, the story doesn’t quite end there. Remember how I thought my wood carving project for the Wood Art Challenge might crash and burn? I still had a bunch of scrap plywood left over, so I thought it would be perfect for a backup art piece, just in case the carving failed and I needed something else in time for the challenge.

Originally, I was planning on making that inspired art piece and a short recap of the conference as one post. But as you can see, the story got… a little long. So, I’m splitting the two, but will share that second art piece today as a tandem post to this one! You can find that project right here.

I actually have a third related post in store that is also inspired by my booth. The white planters you see hanging on the wall of the booth is an Ikea hack, so that will be shared soon too. After making them the first time, I really wanted some for the house. That’s a little further down on the priority list until I get more of the shed done, though. So go click over to the air plant wall art post. I hope you enjoy!
The post On Creating a Brand Booth for a Conference, aka the Whole-House Takeover of 2018 appeared first on Ugly Duckling House.


No comments:
Post a Comment